.jpg?height=120&name=457020326_534422752294501_6689142057215090446_n-photoaidcom-cropped%20(1).jpg)
This article should give you an idea of how to use LVAR's and how to bind them to external controllers (like a HOTAS or a MIDI controller)
The first step for you is to find out the variable name that you have to use to manipulate a knob or a switch in the plane. You can either read them via 3rd-party software (like SPAD.next or Axis And Ohs), or you can simply look at the following XML file that ships with the Fenix A320:
<your MSFS installation folder>\Community\fnx-aircraft-320\SimObjects\Airplanes\FNX_32X\model\FNX32X_Interior.xml
Here you can find the variable name in the attribute <VAR_NAME>, as well as the different ways of how to manipulate the switch, knob or button.
We want to give you two examples of how to make use of these variables with Axis And Ohs: 1) How to bind the beacon light to a switch on a HOTAS and 2) how to manipulate all integ lights with one encoder on an X-Touch mini.
1) When searching for "Beacon" in the aforementioned XML file, you should find this section:
<UseTemplate Name="FNX32X_Interact_Switch_Toggle_Template">
<ANIM_NAME>ExteriorLight_Beacon_Switch</ANIM_NAME>
<VAR_NAME>S_OH_EXT_LT_BEACON</VAR_NAME>
<WWISE_EVENT_1>ExteriorLight_Beacon_On</WWISE_EVENT_1>
<WWISE_EVENT_2>ExteriorLight_Beacon_Off</WWISE_EVENT_2>
</UseTemplate>
In Axis And Ohs, all you need to do in general is to create a script (menu "Scripting" > "RPN Scripts Editor") and put one line into the editor, looking like this:
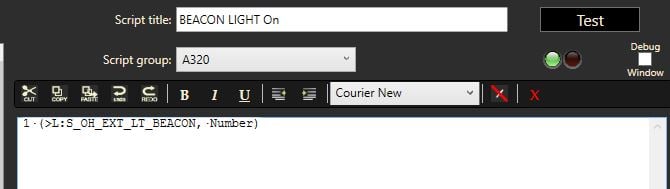
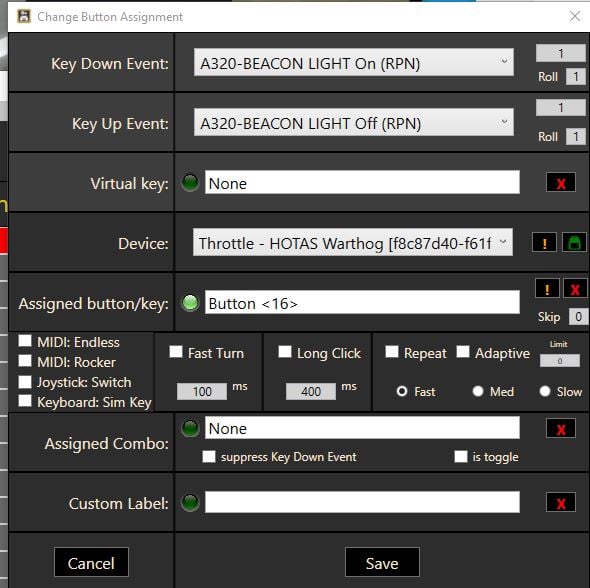
It basically pushes the value 1 to the variable S_OH_EXT_LT_BEACON. Similarly, you create a second script for switching the beacon light off (by pushing the value 0) and save it. The last step is to assign both scripts to a switch on your HOTAS:
The reason why we were using scripts for this very simple manipulation of an on-and-off switch is that we can now use the same method to bind the integ lights overhead, FCU and pedestal to one single encoder on a MIDI device, like the X-Touch mini:
2) Again, you start by looking up the variables that you want to use, in this case it's more than one at a time: A_FCU_LIGHTING, A_OH_LIGHTING_OVD and A_PED_LIGHTING_PEDESTAL. The script looks a bit more complicated, but it basically reads the current position of each knob, and increases (decreases) its value by one step if the maximum (minimum) value hasn't been reached, yet. Here we show anexample for increasing the intensity of the integ lights:
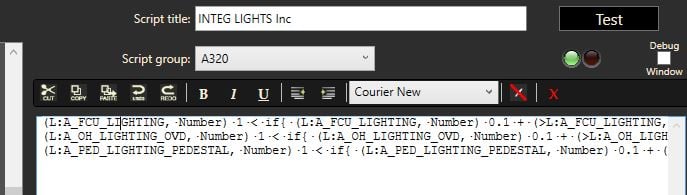
(L:A_FCU_LIGHTING,·Number)·1·<·if{·(L:A_FCU_LIGHTING,·Number)·0.1·+·(>L:A_FCU_LIGHTING,·Number)·}
(L:A_OH_LIGHTING_OVD,·Number)·1·<·if{·(L:A_OH_LIGHTING_OVD,·Number)·0.1·+·(>L:A_OH_LIGHTING_OVD,·Number)·}
(L:A_PED_LIGHTING_PEDESTAL,·Number)·1·<·if{·(L:A_PED_LIGHTING_PEDESTAL,·Number)·0.1·+·(>L:A_PED_LIGHTING_PEDESTAL,·Number)·}
And the code for decreasing them (separate script!):
(L:A_FCU_LIGHTING,·Number)·0·>·if{·(L:A_FCU_LIGHTING,·Number)·0.1·-·(>L:A_FCU_LIGHTING,·Number)·}
(L:A_OH_LIGHTING_OVD,·Number)·0·>·if{·(L:A_OH_LIGHTING_OVD,·Number)·0.1·-·(>L:A_OH_LIGHTING_OVD,·Number)·}
(L:A_PED_LIGHTING_PEDESTAL,·Number)·0·>·if{·(L:A_PED_LIGHTING_PEDESTAL,·Number)·0.1·-·(>L:A_PED_LIGHTING_PEDESTAL,·Number)·}
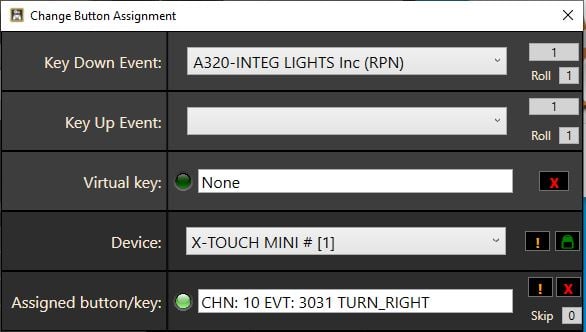
Now you can assign both to an encoder on the X-Touch mini, like shown here for increasing the intensity of the lights:
With these methods, basically all knobs, switches and buttons (including the CB's) can be manipulated by your external controllers. Please understand that we can't give you support on using other 3rd-party tools (like AAO or SPAD.next).